🗓️ 'Book me': An Overview
Book me is Sessions' built-in feature designed to simplify how you schedule meetings.
Instead of wasting hours going back and forth to find the time to meet, you can set your availability in ’Book me’ and let the audience choose which time suits them best.
🔗 Integrations with other calendars
The Book me feature will check your availability across all the calendars synced to your account. It will automatically block the time you have already scheduled for other events in your calendars. This way, you can avoid being double-booked.
For the Book me feature to see your other appointments, you have to sync your external calendars with Sessions.
👉 Read here the steps to sync your calendars with Sessions.
- 🗓️ 'Book me': An Overview
- 🔗 Integrations with other calendars
- 📑 Agenda for booked sessions
- 🗓️ 'Book me': Host's Perspective
- 🏗️ How to create a booking page
- General settings
- Schedule
- Agenda
- 👉 How to add a registration form
- What happens after registration
- Access
- Participants permissions
- Widgets
- Automations
- Recording
- Exit page
- 📩 How to invite others
- ✍️ How to edit a booked session
- 📝 How to edit the ‘Book me’ page
- 💻 How to embed a ‘Book me’ page
- 🤝 Team Routing
- ➡️ How to add team members to your booking page:
- ➡️ Permissions for the team routing’s booking page
- ➡️ Reassigning a booked session
- ➡️ Availability vs. Priority
- ➡️ Team schedule
- ➡️ Removing a team member from a booking page
- 🗓️ 'Book me': Participant's Perspective
- 📖 How to book an appointment
📑 Agenda for booked sessions
This doesn’t mean you don’t have flexibility. You can always add an agenda in each session, or edit the existing one - all depending on the moment's needs.
🗓️ 'Book me': Host's Perspective
🏗️ How to create a booking page
General settings
- From Home, click on the ’Book me’ button (left sidebar).
- Click on New booking page.
- Give a name to your booking (mandatory).
- Set the duration for each booked meeting. You can add multiple durations for the same booking page.
- Scroll to Add reminders and choose when to send an email reminding people about the session they booked.
- Enable/disable the setting that allows participants to invite additional guests when filling in the booking form.
Schedule
- Click on Schedule.
- (Optional) Choose a time zone and the availability period for the booking page.
- (Optional) Choose a Scheduling window. The time frame you set here is how long in advance people can book you. For example, if your scheduling window is set to 30 days, people can book you only within the next 30 days from the current day.
- Click on Edit schedule to customize your availability.*
- Add time buffers before and/or after a booked slot.
- Set the frequency of slots that can be booked (time increments).
- Under Guest can't book a session within, choose how much time needs to pass between the current moment and the moment participants can book a call with you. For example: If this is set to 24h, guests can’t book you less than 24 hours in advance from the current day and time.
- If you want, you can add a maximum number of booked sessions per day. After the number has been reached, people will no longer be able to book you for that day.
Agenda
- Go to Agenda if you want to add one to this booking page. When you choose an agenda, this will automatically be uploaded to all the booked sessions.
- If your agenda isn’t already created, you’ll need to create it in .Agendas
- After you’ve created it in , come back to Book me → Click on the Booking page you were previously working on → Agenda → Add the newly created agenda.Agendas
👉 How to add a registration form
If you want people to fill out a form when they book a call with you, here’s what you need to do:
- Go to Home.
- Go to “Book me” (left sidebar).
- Click on New booking page.
- Click on Form.
- In the Form description box, add instructions for the people who will fill in the questionnaire. (optional)
- If you want to add custom fields, click on + Add field.
- Choose one of the predefined fields (City, Website, etc.) or click on + Custom field button to create a new one entirely.
- Choose a question type (link, number, text, dropdown, etc.).
- Fill in Field label.
- Click outside of the Field label box.
- Click Create field.
- The custom field you’ve created will automatically be added to this booking page’s form.
- When you’re done customizing your booking page, click Create booking.
What happens after registration
You can choose what participants see after they’ve booked a session with you. You have three options you can customize:
- In your Sessions profile, go to Book me → Create a new booking / Edit an already configured booking → Go to Registration.
- Find the setting “After registration action” at the top of the page.
- Click on the left dropdown menu and select Custom Offer.
- You’ll see the list of offers you’ve already configured.
- Select which one to display.
- Click Create / Update booking when you’re done configuring the booking page.
- In your Sessions profile, go to Book me → Create a new booking / Edit an already configured booking → Go to Registration.
- Find the setting “After registration action” at the top of the page.
- Click on the left dropdown menu and select Redirect URL.
- Paste the link in the box.
- Click Create / Update booking when you’re done configuring the booking page.
- In your Sessions profile, go to Book me → Create a new booking / Edit an already configured booking → Go to Registration.
- Find the setting “After registration action” at the top of the page.
- Click on the left dropdown menu and select None.
- Click Create / Update booking when you’re done configuring the booking page.
Access
- Go to Access settings. You have here the following settings:
- Lock session
- Request guest email
- Recording consent
- Memory access
- Request passcode
Participants permissions
- Go to Participants permissions to configure your audience’s permissions:
- Reactions
- Screen sharing
- Allow camera
- Allow microphone
- Hide inactive participants
Widgets
- Go to Widgets to configure what widgets you want visible in the booked sessions that will follow:
- View agenda
- Participants
- Private chat
- Group chat
- Polls
- Q&A
- Takeaways
- Notes
- Transcript
- Offers
- Timer
Automations
- Click on Automations to configure the following automatic actions:
- Automatic recording
- Automatic transcribing
- Email follow-up
Recording
- Click on Recording to configure settings for this feature:
- Full-sized videos in recording
- Preferred layout during conference
- Preferred layout during presentations
Exit page
- Go to the Exit page to configure the following:
- Collect feedback: You can choose if the feedback window at the end of the event is:
- Owner feedback: The feedback participants submit will only be visible to the Host, in Memory.
- Sessions feedback: The feedback participants submit will reach Team Sessions.
- None: There will be no feedback window displayed at the end of your event.
- Final call to action:
- Custom CTA: Give participants a last chance to visit your website or access a special deal.
- None: There will be no offer or CTA displayed at the end of your event.
👉 See more:
📩 How to invite others
The easiest way to invite others is to click on Copy session link and send it via your preferred channels.
Participants can add up to five other people to attend the appointment directly from the Booking page. Participants receive a confirmation email after booking a session with you. You will see the session in
✍️ How to edit a booked session
- Go to Sessions .Calendar
- Find the session you want to edit. Click on it.
- Click on that meeting’s More options (⋮) button, which allows you to:
- Copy the session link
- Edit the session
- Delete this session. Those who booked the session will be informed that you’ve canceled the appointment. You can let them know the reason in the dedicated input field.
📝 How to edit the ‘Book me’ page
Should you want to edit your booking link, click on More settings (⋮) in the top right corner. You have the following options:
- Disable the booking page. Booked future sessions will be automatically canceled. However, after turning the booking page back on, you can still see the previous bookings that took place.
- Preview the booking page as your invitees see it. You can test how the booking flow works.
- Edit the booking page. You will be able to review and edit all the booking details: name, duration, schedule, availability, agenda, etc.
- Delete the booking page. Unlike disabling it, deleting the booking page is permanent. All future sessions your participants have booked for this page will be disabled. They will be notified that this booking link is no longer available.
💻 How to embed a ‘Book me’ page
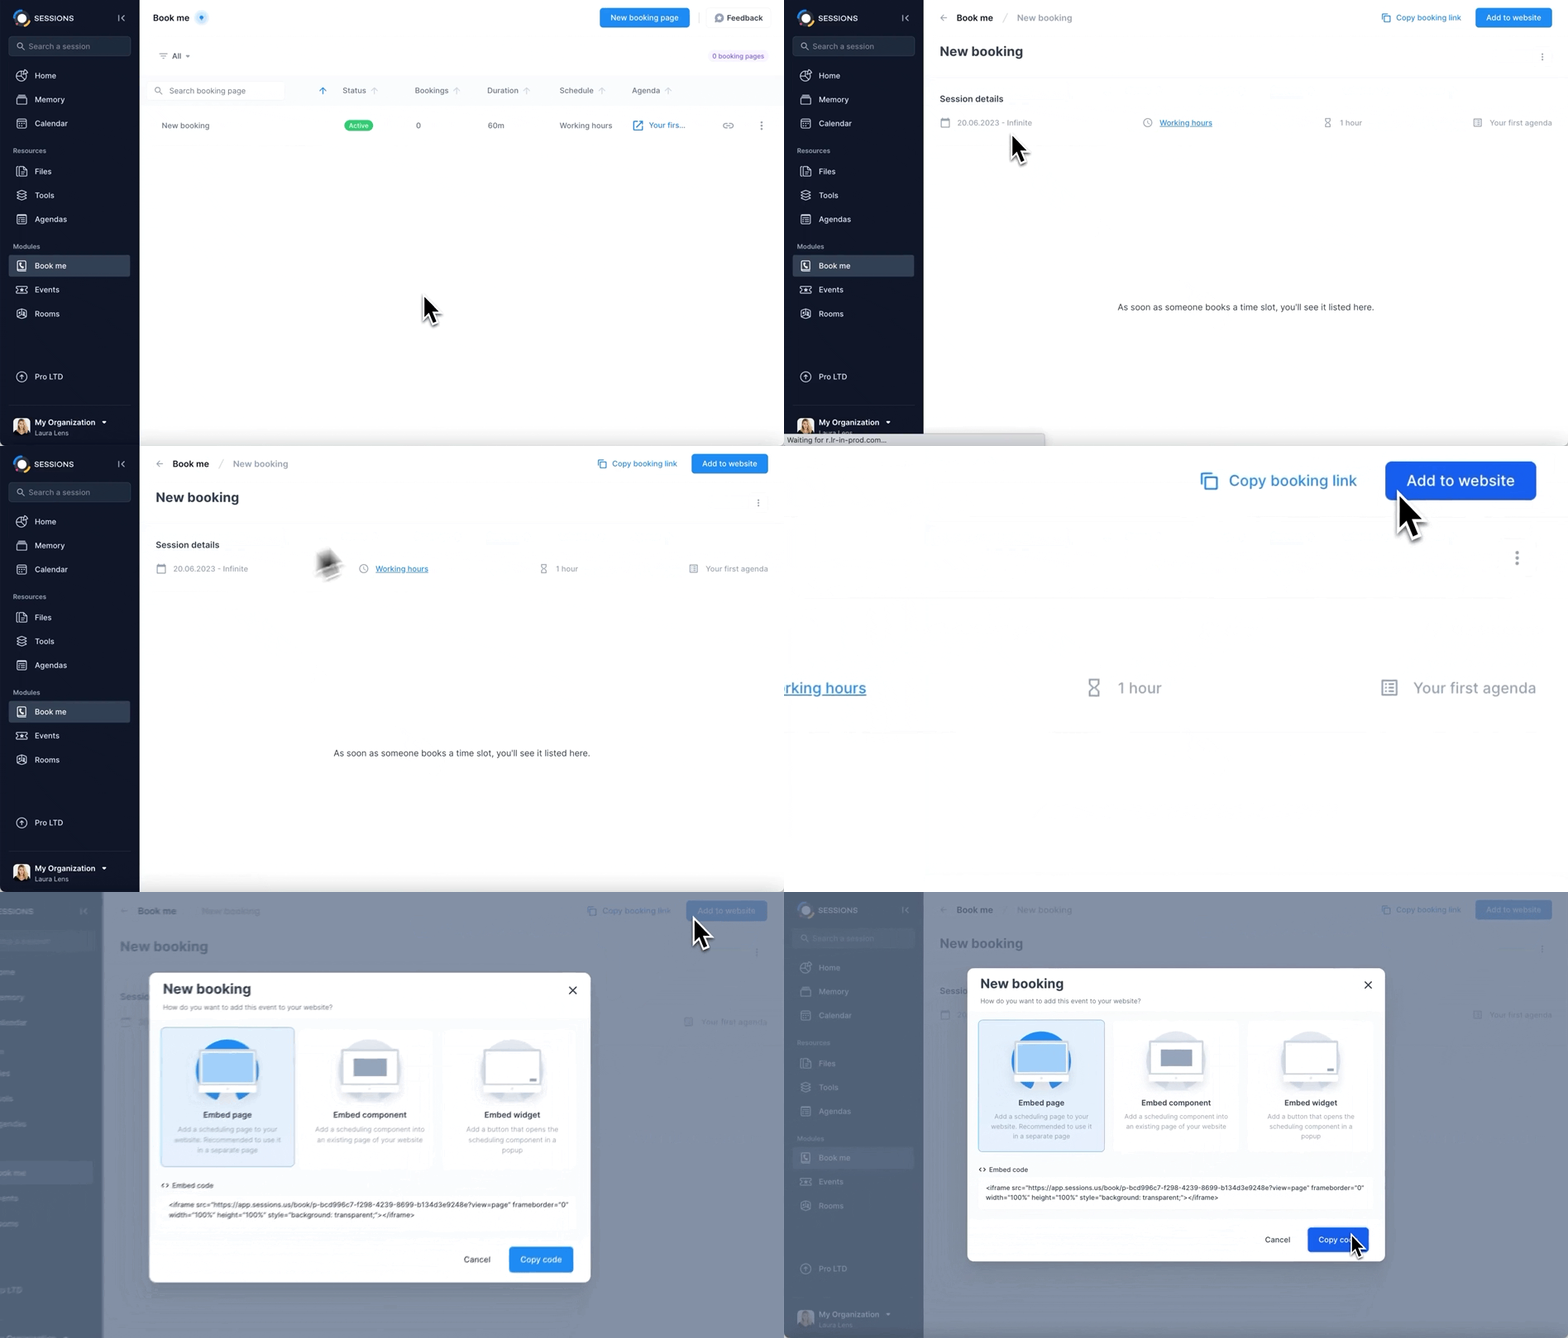
You have three ways to embed the booking page created into your website. To access them, open the booking page in Sessions and click Add to website (top right corner):

- Embed page: Add a scheduling page to your website. We recommend using it on a different page.
- Embed component: Add a scheduling component to an existing page of your website.
- Embed widget: Add a button that opens the scheduling component in a popup.
🤝 Team Routing
You can assign up to 20 workspace collaborators to a booking. Booked sessions will be distributed between these collaborators.
➡️ How to add team members to your booking page:
- In Sessions, click on ‘Book me’. (left sidebar)
- If you have not configured a booking page yet, click on New booking page. Configure all the details and click on Create booking.
- If you already configured the booking page, click on it.
- Click on Add team members (top right corner).
- In the new pop-up window, search for your teammates by name or email.
- Select their account and click Enter.
- Choose what permissions you want them to have (see below Member permissions for the booking page 👇).
- Click Done.
- The changes are automatically saved.
➡️ Permissions for the team routing’s booking page
- They can accept and conduct bookings, assign a session to other team members, and edit the booking page (”Accept, reassign and edit”)
- They can accept or reassign a session to other team members (”Accept and reassign”)
- They can accept and host booked sessions (”Accept bookings”)
➡️ Reassigning a booked session
🎁 How to reassign a booked session:
- Go to your Sessions Home → Book me.
- If your booking page is already configured, find it on your list of booking pages and click on it. (If it isn’t, click on New booking page and go through the setup process.)
- Find the booked session you want to reassign.
- Under the name of the booked session, you’ll see a team member’s name. That person is the one to whom the session has been assigned.
- To reassign that booked session, click on the team member’s name.
- From the dropdown, choose another person team member.
- Done. The new team member is the new assignee for that booked session.
✉️ Email notifications
A newly assigned person will receive an email notification and the booked session will automatically appear in their own Sessions account. The original person who was assigned will also receive an email notification letting them know that the meeting has been reassigned.
👉 Who can reassign a booked session:
- The owner of the booking page
- Team members who’ve been permitted to reassign bookings. To give a team members this permission:
- From that booking page, click Add team members.
- Add the team member.
- From the dropdown, choose one of the options that allow team members to reassign booked sessions:
- Accept bookings (does NOT allow reassign)
- Accept and reassign (allows reassigning)
- Accept, reassign, and edit (allows reassigning)
➡️ Availability vs. Priority
As the booking’s owner, you can choose if the booked sessions will be assigned to the team based on their availability, or according to the priority list you’ve created for the team. The booking system will then take into consideration first priority, then availability.
Availability
If you prefer the booked sessions to be assigned based on the availability of your team members, follow these steps:
- In Sessions, click on ‘Book me’ (left sidebar).
- Click on the booking page you want to edit.
- Click on Add team members (top right corner).
- Choose what permissions you want to give them for this booking page.
- Next to Distribution, click on the drop-down menu.
- Select Availability.
- Click Done.
Priority
If you prefer the booked sessions to be assigned based on priority, follow these steps:
- In Sessions, click on ‘Book me’. (left sidebar)
- Click on the booking page you want to edit.
- Click on Add team members (top right corner).
- Next to Distribution, click on the drop-down menu.
- Select Priority.
- Click on the blue double-lined icon (═) to drag and drop your team members. Re-arrange them from highest to lowest priority. ⬇️
- Click Done.
➡️ Team schedule
As the booking’s owner, you can create one schedule for the entire team, or you can choose to split the schedule into days/hours, and assign individual team members to each section of the schedule. Here’s how you can do that:
- Find the booking page you want to edit. Click on it.
- Add your team members (see How to add team members to your booking page ☝️).
- Click on the More options button (⋮) in the upper right corner.
- Click on Edit booking page.
- Click on Setup → Schedule.
- Scroll down to Schedule → Per team member and toggle on this option.
- Click on a team member’s name.
- Click Edit schedule. Configure their schedule.
- Click Save changes. Give the schedule a name.
- Repeat steps 7-9 for all team members.
- Click Update booking.
Team members can see their schedules in the “Book me” feature, in their own accounts. If they don’t have permission to reassign and edit the booking page, the only schedule they see is their own.
➡️ Removing a team member from a booking page
To remove a team member from a booking, follow these steps:
- In Sessions, click on ‘Book me’ (left sidebar).
- Click on the booking page you want to edit.
- Click on Add team members (top right corner).
- Find the team member whose access you want to remove from this booking.
- Click on the X icon attributed to them.
- Click Remove to confirm your action.
- Click Done.
🗓️ 'Book me': Participant's Perspective
📖 How to book an appointment
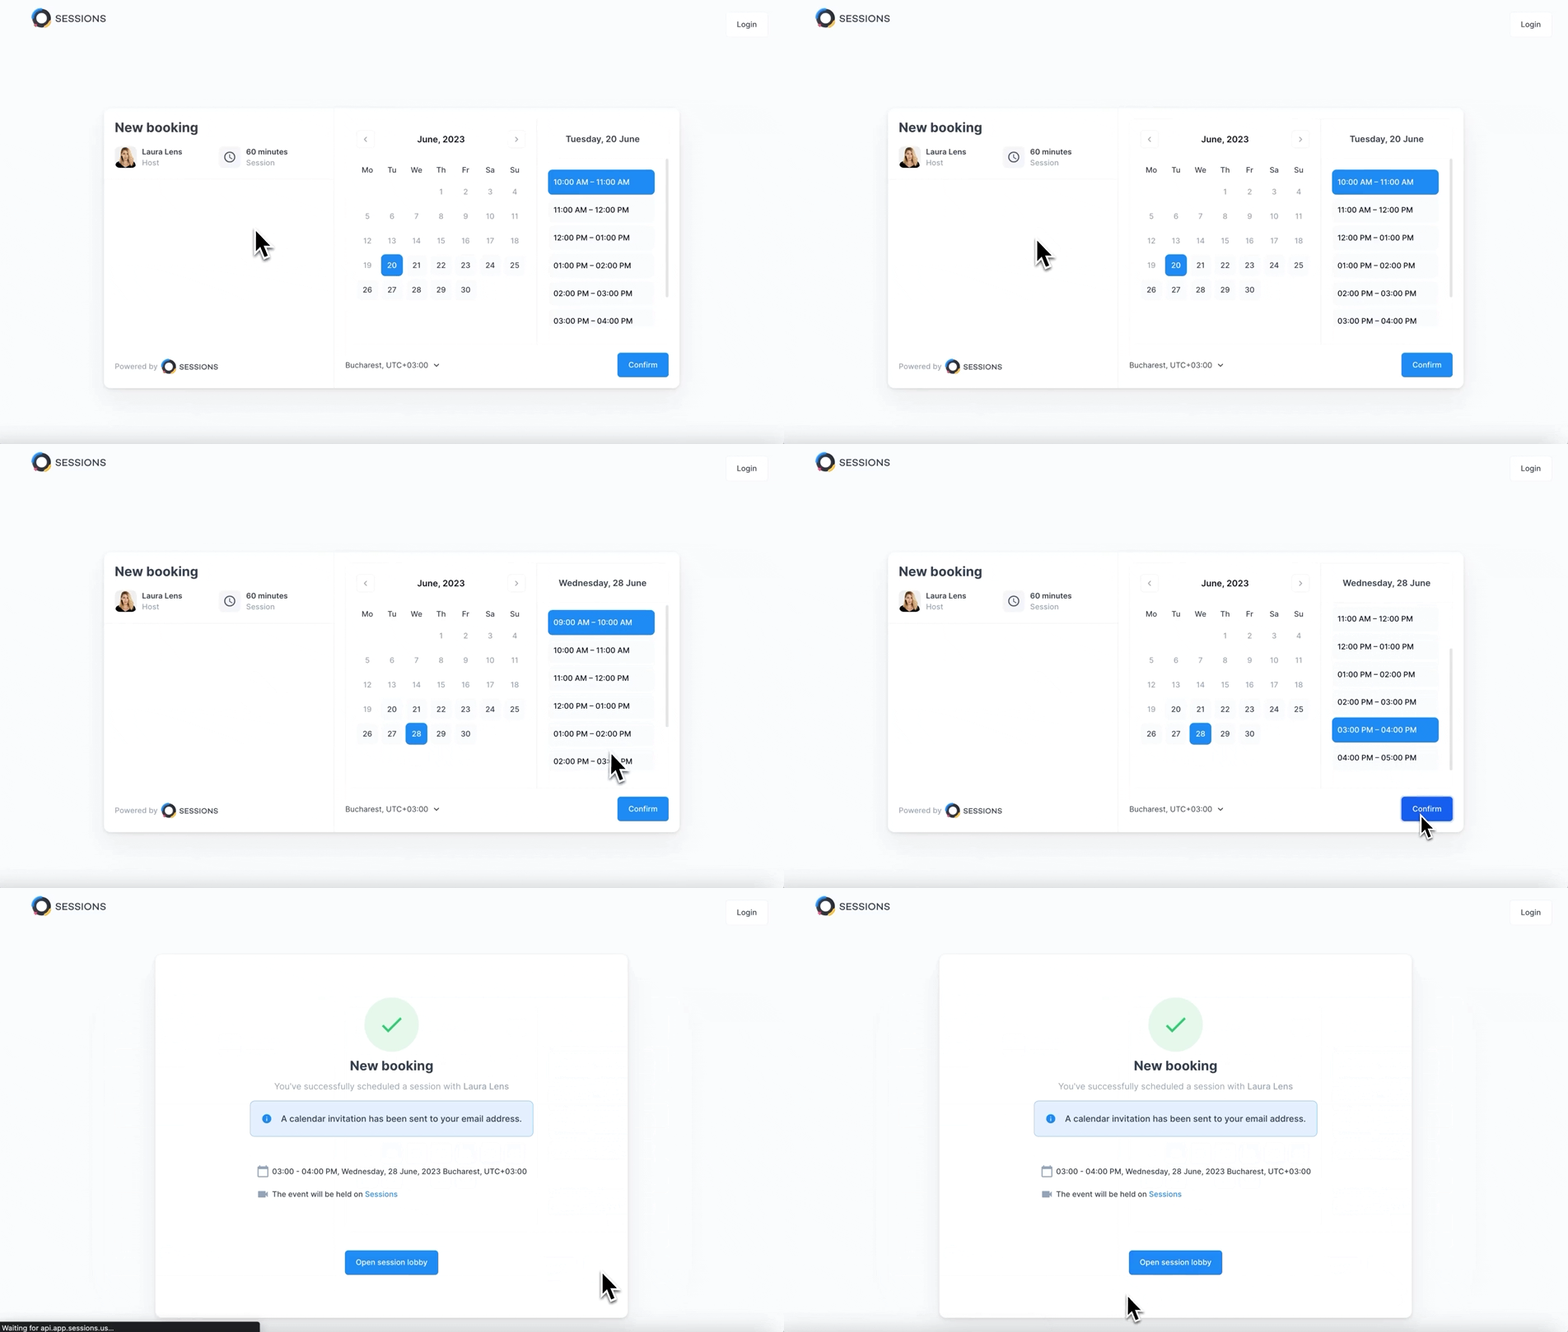
- Access the Sessions link shared by the person you’re trying to book.
- You’ll be redirected to see their availability.
- You can see here all the details (name of the organizer, duration).
- In the top right corner, you can switch the default language (English) of this page to another one (Italian, Spanish, German, Chinese, Portuguese, etc.).
- On the right side, you will see the Host's available time slots where they can be booked.
5. Select the slot that suits you.

6. After selecting the desired time and date, click Confirm.
7. Fill in the form.
8. Click Schedule session.
- Done. You’ll receive an email confirming your booking.
